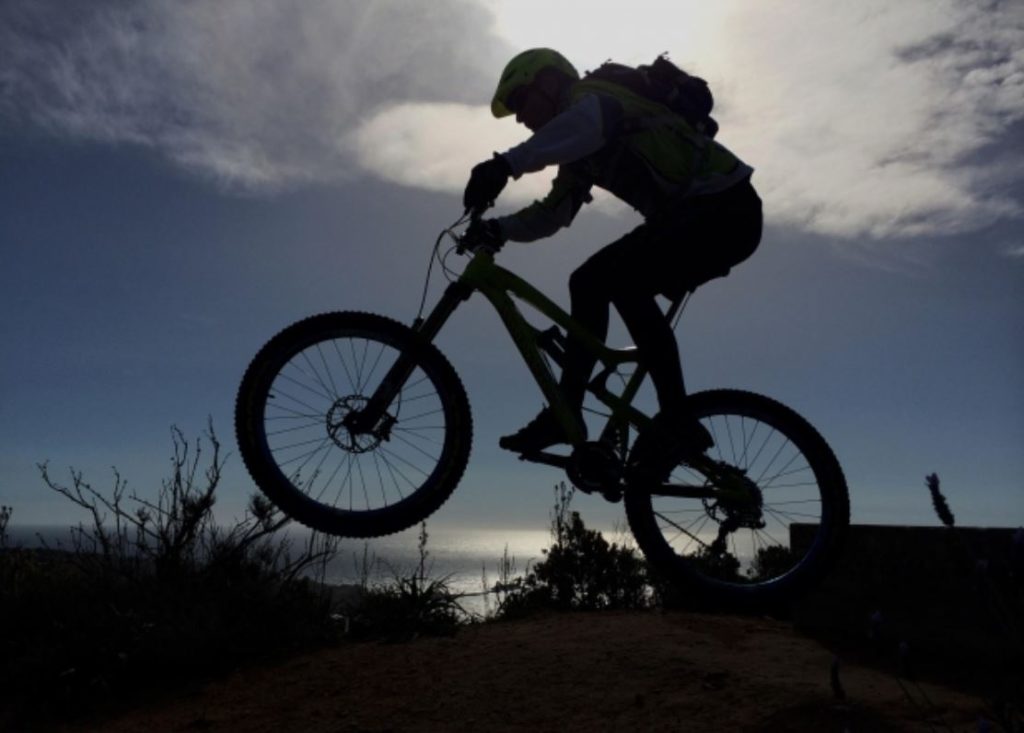
When I started practicing bunny hops on my mountain bike, I thought getting the rear wheel off the ground was simply impossible. It just did not click in my head.
It’s a common problem, so if you’re having troubles don’t feel alone, I’ve been there and know exactly how it feels. Don’t let it beat you! It’s all part of the process – and mostly in your head as well.
We’ll talk about the mental challenges of doing bunny hops later in this post. This will go through everything from A to Z. Hopefully. I would like to put that first but I know you’re here for one main reason: to really learn the technical side of doing a bunny hop. So let’s dive into it!
Contents
Bunny Hop Safety Review: Fox Launch Knee and Shin Guard
SAFETY *FIRST AND FOREMOST*
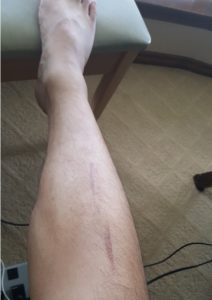
Get yourself a decent pair of shin guards. I cannot tell you how much pain and suffering you will save yourself from, and possibly long setbacks, if you get proper protection. I have a 4 inch scar on my right leg that can tell you all about “shinners” if you would like! Usually it is your dominant foot that will be the one to suffer too. The force of a pedal slap equals the force you were using to attempt a bunny hop; so if you can imagine how much physical energy is placed on the bike pedals and cranks… that same energy will hit your shins…. absolutely nuclear. I became a practicing physicist after it happened. Kidding. What I actually mean is that pedal slaps hurt. A Lot.
You have to tame yourself before you can tame your bike! The saying is, “It’s the rider…not the bike!” So get the right protection, and get it early on to save yourself from the pain, the hurt. You don’t want to be out for a few weeks or months just because you didn’t want to get $30 in protection. Don’t be a shinner! Confess!.. I was saved by shin guards and you will too! Thank me later..
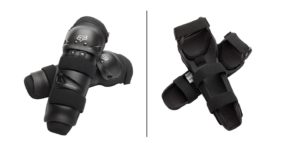
I have this cheap pair that has saved me countless times. I ride with them ON 90% of the time no matter what the temperature or the conditions. The few times when I try to do some bike tricks without them are the times that get me hurt – of course right?! I wear the Fox Racing Launch Sport Knee Pad above. That’s cheap insurance guys. REALLY cheap. There are more expensive shin pads but these are easy-on and easy-off with velcro. I don’t have to take off my shoes. I do own a nice (and ridiculously expensive) pair, but when I’m just practicing these are my go to.
- Oh yeah don’t forget your helmet, gloves, goggles, bullet proof vest, bear spray, air horn, survival kit … all good options. Can’t go without bug spray either.. it’s a safety thing – don’t want mosquitos and chiggars making their way into my shorts which has happened and made for a pretty uncomfortable ride.
- Slam your bike seat to the lowest setting– if it’s too high it will make bunny hops harder since the saddle is in the way of your body’s mechanics to do the hop
- Your bike should be properly fitted for your height since that would make hops easier to perform
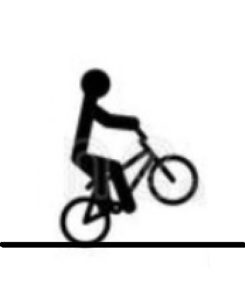
Upwards to the good stuff! (NOTE: Apologies for the stick figure photos, I tried to record and take pictures of doing hops myself but it’s difficult to capture the key moments.. so use my stick figure pictures with a grain of salt!)
How to Bunny Hop A Mountain Bike: Start Small!
1. How to Lift The Front Wheel of MTB
If you’re an absolute total novice, the first step is lifting the front wheel.
Assuming you have a mountain bike with a front suspension fork, like most modern mountain bikes should have, you will want to do what’s called a “preload.” This is where you will push down on your handlebars to compress the front suspension and then quickly push off in order to spring upwards. The “pogo effect” from your front fork’s suspension should help with giving you more height and lift.
- Preload by bending knees and lowering chest to handlebars
- Shift your body back (and butt behind saddle) while simultaneously…
- Keeping knees bent
- Back straight
- Pulling on handlebars with arms straight – this should lift the front wheel off the ground
- Let front wheel come back down
It resembles doing a “manual” (a wheelie without sitting on the saddle).
Front wheel lifts can be practiced anywhere. It is “usually” pretty easy so practice this first by going over street curbs. Street curbs are awesome for practicing any trick actually.
Once you get that front lift down the next step is the getting the back end up.
2. The MTB Bicycle Rear Wheel Lift Up Challenge
This was my biggest challenge in the early days – I thought it was impossible! How is it possible to lift the rear wheel when most of your body weight is on it?! Let that go, because it is possible with a methodical and logical approach! I’ll break it down.
The key to lifting the back wheel up for a bunny hop is dependent upon:
- Shifting your body forward closer to handlebars AND using them to hold most of your weight
- This un-weights the back wheel and places more body weight on the front wheel
- Using your feet to scoop the pedals – which in turn takes the rear wheel come up off the ground
Here’s a tip to help get the rear wheel lift: just before I lift the back end and rear wheel up, I do a little preload (similar to front wheel but with my legs) by pushing down on the pedals (like a small squat with both feet on the pedals). This gives some momentum to “bounce” off the rear tire (or suspension if you got a full squish). I then quickly move my body up and forward towards the handlebars (off the saddle) while “scooping” my pedals with my feet to lift the back wheel up.
Essentially, you take your weight off your rear wheel, and transfer it to the front wheel… make sense?
Mentally, imagine making the back wheel as light weigh as possible, actually making it ZERO weighted is what you want, to get it up and off the ground.
Also, the ‘scoop’ isn’t as dramatic as you think – it’s mostly pointing your toes slightly downward, heels go slightly upwards which allows just enough force on the pedals to control of the bike’s rear end with your feet.
This is a tricky technique that will take a little bit of time to grasp – it did for me! But keep practicing and you’ll get it.
Why I needed the rear wheel lift in my arsenal of skills? One day when I decided to get it done because I was going through this in my head:
“OK I need to get this rear wheel lift to start happening because all these dang pinch flats from my rear wheel hitting a rock or square edge are driving me absolutely insane. CMON.”
Not to mention, after years of riding .. it was a little embarrassing. Today I can feather my rear wheel over rocks and curbs so I don’t have to deal with pinch flats as often. It’s super satisfying!
Also, when you ride up to an obstacle at an odd angle, the rear wheel lift is mandatory or you will just slide along the object you’re trying to get over. For example, try getting onto a street curb at 45 – 60 degrees without lifting up your rear wheel at a slow speed… you’ll slide along the curb! So, lifting the rear wheel is a crucial part of mountain biking, and will help immensely out on the trail.
Definitely take some time to practice and acquire this skill. Keep trying on flat ground first.
TIP: Use your front brakes (feathering it) to help get it faster, but you really want to get the basic rear wheel lift technique without using the brake eventually too. Rear wheel lifts are called endos when the front brakes are used, an intermediate bike trick.
Once you get both the front and rear wheel lift techniques down, combining the two simultaneously is where the real fun begins!
3. Independent Front and Rear Wheel MTB Hops over Street Curbs
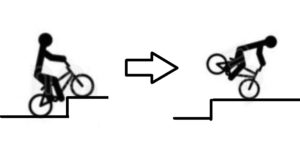
Go find the nearest street curb and practice the front lift and the rear lift together back-to-back. What I mean is riding directly at a street curb head on, then performing the lift so your front wheel passes over the curb without hitting the edge. Then landing the front wheel on the other side and allowing the curb to pass underneath the bike until you can perform the rear wheel lift to avoid hitting the curb as well.
You’re not exactly “hopping” the whole bike in the air at this point, but you should be getting the hang of controlling your front and back wheels.
At this point you should be getting much more excited about how much more control you have and things should be getting more exciting and fun!
4. How to Perform the English Bunny Hop
Combining a Front and Rear Hop Simultaneously
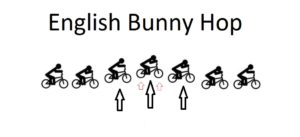
Here we go!..when combining both the front and rear hop simultaneously, you can lift both the front AND rear tires up and into the air at the same time. To me, this is the easier of the two types of bunny hops. Being able to use this technique for maneuvering my bike is a really helpful skill out on the trails for better positioning and control.
How bunny hop in ENGLISH:
- PRE-LOAD both the front and rear wheels by:
- Lower your chest to your handlebars while simultaneously
- Bending your knees
- Keeping back straight
- Explode upwards with the help of the suspension and tires
- Your arms will be pulling straight up
- You’re pretty much standing up at this point
- Your feet will be scooping your pedals during the explosion
This should get both tires off the ground at the same time. NOTE: Slight modification here – you don’t have to get your butt behind the saddle for English bunny hops (you will for American).
I mastered the english bunny hop by “side-hopping” up street curbs. I rode slowly along the curb and hopped laterally onto it (I watched too many Danny Macaskill videos). It’s pretty difficult but try it because it forces you to get both wheels up and onto the curb (shin pads required!)
You won’t get much height on this type of bunny hop, but when you get better control of english bunny hops you can use it to side hop or to re-position your bike – even from a track stand … which is always a great skill to have in your bucket on the trails.
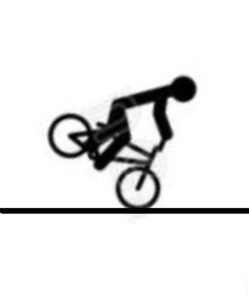
5. How to Perform an American Bunny Hop in 7 Steps
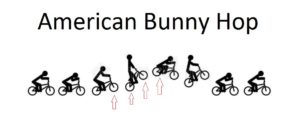
This is the bunny hop of dreams everywhere. This is also where you REALLY want to have a pair of shin pads or there’ll be nightmares. How did I get a 4 inch scar on my leg from mountain biking? From a bad attempt at bunny hopping over an obstacle where my foot slipped causing the pedal to slam AND slice my shin open. Sounds beautiful doesn’t it? Get the shin pads!
OK So the American bunny hop is just a totally cool trick, but so few can get the technique down to get the height to impress (I’m at 18 inches – decent but could be better). I want to be able to go higher than the diameter of my bike wheel… which is approximately 24 inches depending on tire size. Another 6 inches is quite the feat!
Anyway, to do the American Bunny Hop it takes all the skills learned from what we’ve learned so far: front wheel lift, rear wheel lift, english hop – and adds a few more modifications too… dont worry they’re minor!
Here’s everything to get the American bunny hop established:
- Preload front and rear suspension (chest lowered, knees bent, back straight)
- Lift front wheel by moving body weight back and pulling on handlebars – arms should be straight for a split second
- Explode upwards and lift front wheel as HIGH as you can
- Pull handlebars towards your body (usually towards hips) while in air for even more height
- If you do that correctly, you’ll notice that youll take the rear wheel off the ground without even trying
- At peak height of your front wheel, push and shove the bike forward in the air by extending your arms and handlebar away in front of you
- This will then allow your feet some opposing force to SCOOP up the rear end which you can than get more height on the rear wheel
It’s pretty hard to explain how to do bunny hops in textual form, but the stick figure picture above explains it all pretty well!
When you put it all together, the American bunny hop is done in one fluid motion of the ocean. Once you get it, you’ll be launching yourself over logs in no time!
Here’s a tip I found that helped me get the American bunny hop: Lift the front wheel as HIGH as possible! Just preload and blast off!
The Mental Blocks About Bunny Hops
 Before I knew how to bunny hop, I only had the front wheel lift. On the other hand, the rear wheel lift, nope – THAT was the challenge. Like all challenges, getting the bunny hop was both a mental challenge as well as a technical one, for me anyway.
But of course it’s a mental limitation that prevented me from getting the trick, so I just kept practicing and kept forcing myself out of my comfort zone to do it. It was the only way. It is the only way. I suited up everyday with my helmet and gloves and shin pads and with practice over time I just started getting more confident in doing them.
I also “shinned” myself alive so many times I was actually getting paranoid of pedal slaps from doing hops. Even with the shin pads on, it still makes me nervous because of the “pain” from past failed attempts. But I just keep pushing forward. Overcome!
Another issue I had was being afraid of looping out (that’s when you shift your weight so far behind the saddle, you’ll actually fall off and the bike shoots out from under you). Although I had the front wheel lift down way before I started practicing bunny hops, I wasn’t doing them the correct way – which is to shift your weight back and pull the handle bars. I felt like I was going to loop out and fall flat on my back or hit my head on the ground. With practice, I got over that too! Looping out isn’t so bad if you get a feel for it coming and can bail before it happens.
Rear wheel lifts are what did not register very well in my head, and as I mentioned I just had to take a methodical and logical approach to doing them. Then it clicked!
Now I’m working on height and what I once considered mental roadblocks are not a big deal anymore, now it’s about focusing on my launching and landing techniques for a smoother trail ride.
Bunny Hop Tutorial Conclusion: Practice Makes Perfect
Video record and watch yourself. It’s actually a really good strategy so you can understand what you’re doing wrong. If you can criticize yourself and then correct your mistakes while performing the bunny hop, you’ll progress a lot faster.
Everyone has a smart phone these days, so it should be a totally easy option to help you get toward your bunny hop goals. Get a friend to hold your camera. Watch the video and find out where you’re going wrong. Maybe you thought you were pre-loading the front of your bike, but the video shows otherwise. Maybe you’ve got the American hop down but can’t get the rear up higher because you didn’t shove the bike forward while scooping. Get what I’m saying?!
Doing the video recording will help you tremendously in refining your techniques.
In the end, getting the bunny hop gives you better line choices when you need it out there on the trail. Adding the bunny hop to your arsenal will totally change the way you ride for sure. It just makes riding more fun in general. If you can overcome an obstacle on the trail easily it takes less effort and thinking, allowing you to focus on other things like your speed and direction and your LINE.
If you would like me to add or clarify anything, please let me know any time!
Just go out there and do it!
Rider up!